Aaron Barnett of BangingToolbox suggests:Getting your hand dirty with a laser level can be overwhelming if you don’t know all the parts.
For someone in the Stone Age and about to purchase a new laser level, everything might seem complicated for you compared to using a manual level.
Our advice is to be an expert on every tool that you use, including your laser level, and get to know your device better.
The first step to understanding your laser level is to familiarize yourself with all the external and internal parts.
Knowing the parts of a laser level can help you understand how the measuring tool works and how to operate it efficiently.
Next, getting to know everything helps you perform basic troubleshooting, like adjusting the calibration and checking for accuracy.
This knowledge will help you choose the right laser level before making a purchase.
Also, knowing the sensitive parts will help you work with your laser level carefully and not damage the internal mechanisms.
So if you’re ready, let us look at each part closely, even the parts hidden inside the case and connected to the tool’s internal motherboard.
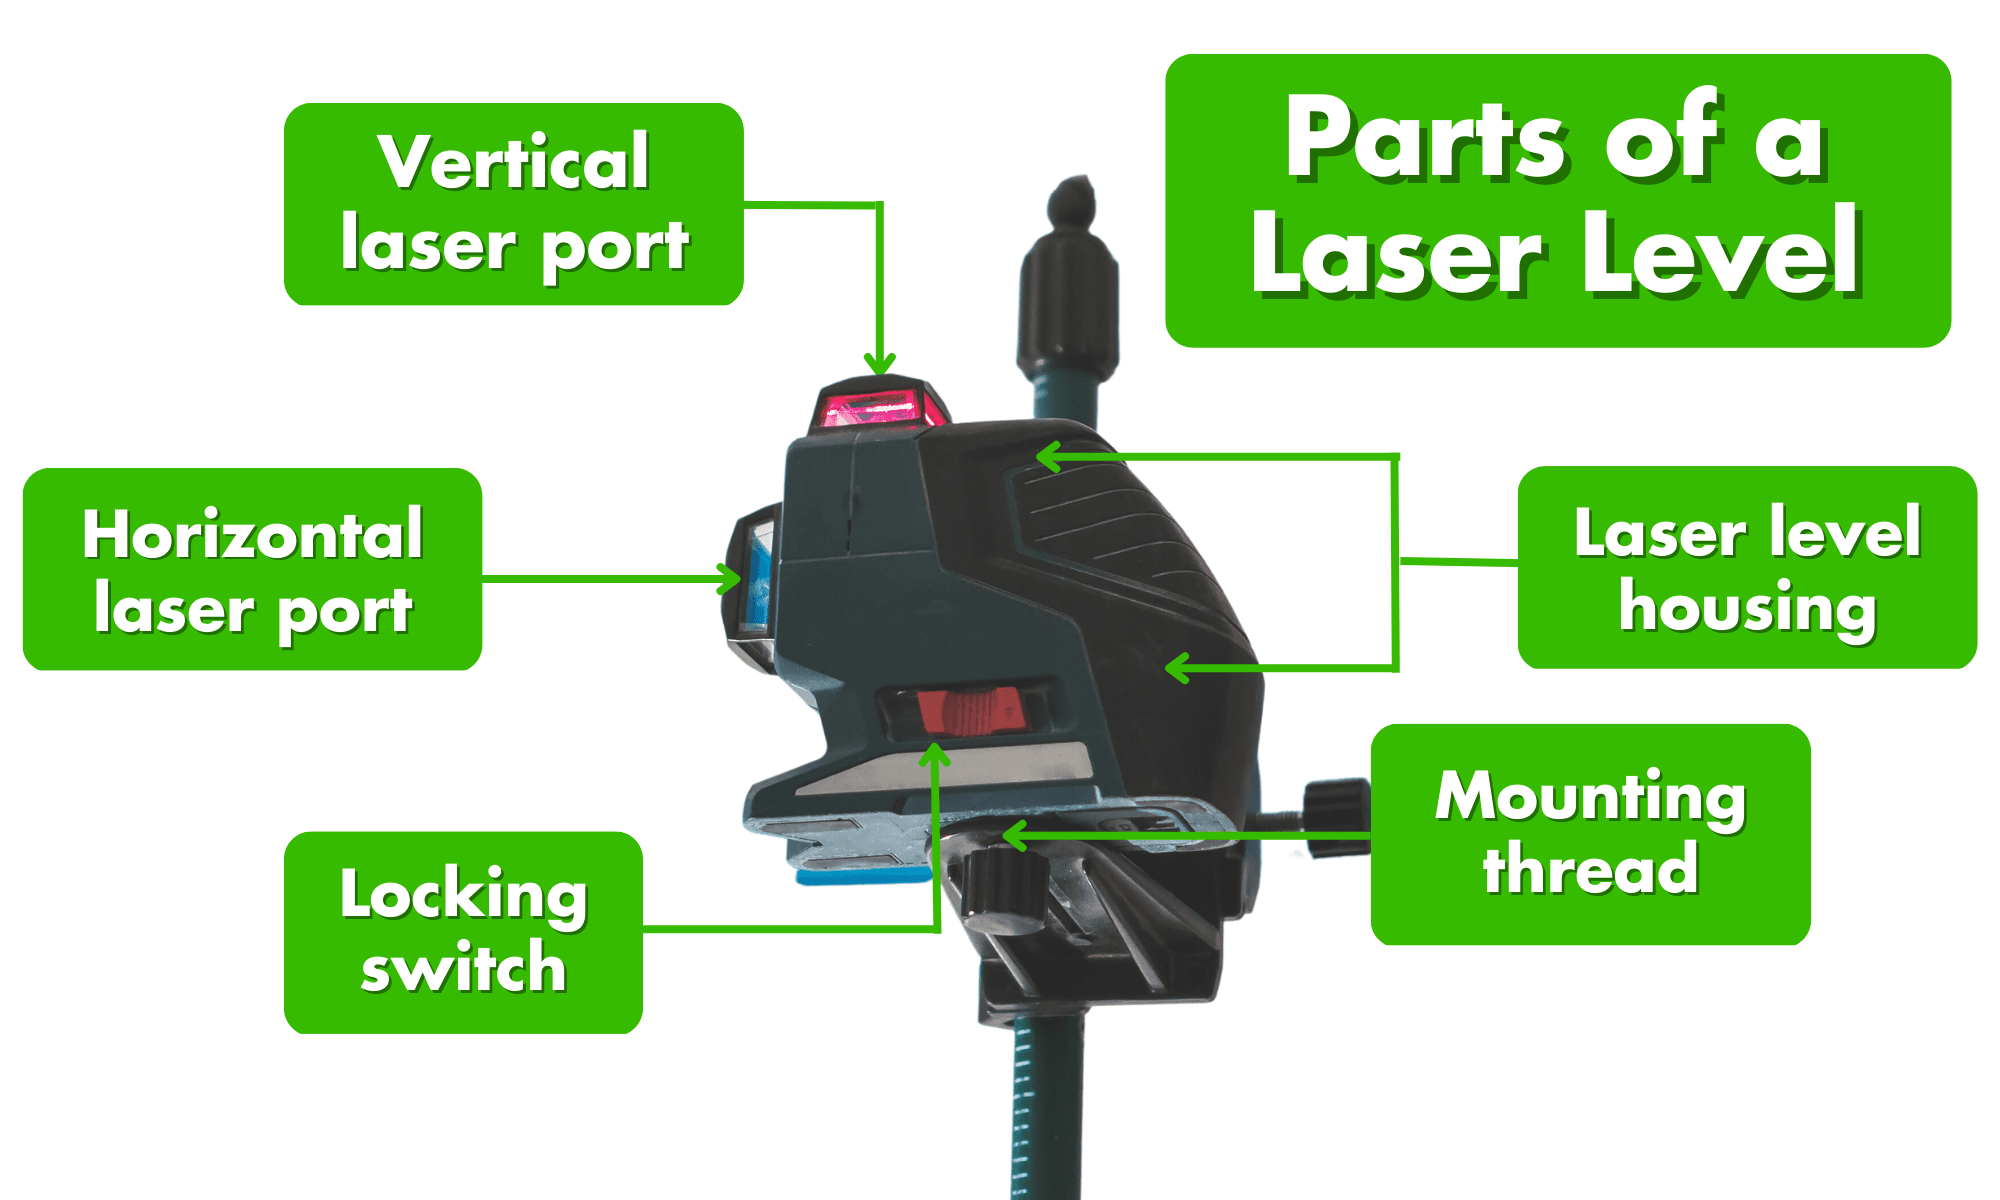
The vertical laser port
A vertical laser port projects a vertical laser beam perpendicular to the horizontal line. The line works by using a separate diode inside the laser level that is oriented vertically.
You’d usually find this port on both sides of the laser level protected by a plastic or metal housing.
This protective housing has a small window or opening to give way to the emitting beam of light. Some laser levels have two vertical laser ports creating a perfect square.
To use the vertical plumbing feature, position your laser level on a stable surface perpendicular to the spot you intend to project the vertical line.
If you want to refer to the vertical beam on the wall, you can place the tool on a tabletop or your workbench. Make sure to use a suitable offset measurement.
The vertical line function is especially helpful for laying out wall framing, setting up cabinets and shelvings, and hanging artwork on walls.
You’ll often find vertical laser ports on cross-line laser levels and 360° rotary laser levels. And a chippy commonly used 5-point laser level.
What are the Parts of a Laser Level?
The Horizontal laser port
A horizontal laser port is the opposite of a vertical laser port. The port instead projects a horizontal beam perpendicular to a vertical line and is perfectly level.
The horizontal beam serves as a reference line that you can use for laying tiles, leveling floors, or installing drop ceilings.
Like the vertical laser port, a protective casing with a small opening protects the separate diode emitting the horizontal beam.
This diode utilizes an internal leveling mechanism that keeps the beam level even when tilted or moved.
You’d usually find this port on top or at the bottom of the laser level.
To use the leveling function, simply place the device on a stable surface. However, it is good practice to test the lines for accuracy before working.
Control panel
A control panel helps you modify and adjust any settings and control functions on the laser level.
The set of buttons on the top allows you to adjust or set the projection of the laser level, change beam brightness, or turn the self-leveling or pulse mode on or off. This panel also helps you set the projection’s accuracy and range.
1. Mode buttons
The mode button allows you to set any mode or function available to your laser level:
Horizontal mode
Vertical mode
Cross-line mode
Manual mode (locked and not level for setting angled straight lines)
Pulse mode (To save battery)
Outdoor mode
The availability of the buttons and functions depends on the model of your laser level.
2. Calibration button
Some models contain a calibration mode or function where you can adjust the internal mechanism to provide accurate leveling when misaligned.
Most laser levels are self-leveling and require specialized people for any maintenance if ever required. Do accuracy tests yourself
3. Brightness button
As the name implies, this button helps you adjust the brightness of the laser beam. Leveling can be challenging if you try to view the laser beams outdoors in daylight.
Or, the beams could be too bright for what you need when leveling indoors, and you want to consume less battery.
You can adjust the beam’s brightness if you work inside or outdoors. This, in some models, is known as pulse mode, as the brightness is dimmed by fast flickers or pulses. All you can see, however, is a less bright projection.
Charging port
The best laser levels use a rechargeable battery to power up the device and a removable and replaceable power pack.
You can easily spot a charging port on a laser as a tiny hole or, sometimes, a USB port.
The usual jack size of the charging port is sometimes 3.5 mm.
Laser level diodes
The laser-level diodes are components responsible for producing light beams.
Made from semiconductor materials, the laser diodes are used to project a plumb line used as a reference to common leveling tasks.
Depending on the model or type of laser level, a device may contain a single diode or multiple diodes to project reference patterns on any surface.
The lens
The lens of a laser level is crucial to shaping and focusing the beam emitted by diodes.
It should be made from a superior quality optical material, usually plastic or glass, that directs the beam direction.
For example, you can rotate the lens to project the vertical or horizontal line or produce a wide or narrower beam.
Also, the lens serves as direct protection for the diodes from dirt or dust aside from the protective housing of the laser level.
Locking knob or switch
The locking knob or switch is used to lock the level position in place. The switch prevents the pendulum from moving when the device is in or not in use for protection.
The locking mechanism could either be a magnet or a clamp system or any locking mechanism that will prevent the pendulum from moving and self-leveling when engaged.
Battery compartment
The battery compartment houses the rechargeable battery in place and protects the terminals from outside elements. The position of the battery compartment varies in different models.
You’d typically spot the entrance at the bottom rear of the tool.
Shock-absorbing housing
The housing of a laser level is a protective casing that encloses the device’s internal components and protects it from impacts, drops, rolling, and collisions.
The casing’s internal components contain sensitive materials, such as mirrors, lenses, and diodes, that may affect the performance of the laser level if damaged.
Mounting thread
The mounting thread is a standardized thread used for mounting accessories like tripods, magnetic brackets, or stands.
You can find this thread on the bottom rear of the laser level. A platform surrounds the mounting thread for secure and stable mounting at different heights and elevations.
Now that you know the parts of your laser level
It’s easier to identify parts when you know what to look for.
Note that some functions and components may not be available because there are many laser-level types.
Not every laser level will have a vertical line. Not every unit will have calibration mode.
You may opt for a single-line laser level if you’d most likely lay out tiles or trims and install cabinets and shelves.
If you will frame walls, drop ceilings or soffits, or align windows and doors, a cross-line laser level or a chippy 5-point laser level will suit your jobs.
One step you’ve made ahead of the rest is that you already know the basic parts of a laser level.
So that you will not have any difficulty operating a laser and talking about your technical knowledge on the building site.