
- Materials you can cut with a table saw
- Parts of a table saw you need to know
- Ensure safety while working with a table saw
- How to set the blade height?
- How to set the guide rail position?
- How to secure the wood on the table saw bench?
- How to feed the material into the blade?
- How to make crosscuts with a table saw?
- How I make angled beveled-cuts?
- How I cut joints using a table saw?
- How I cut kerfs with a table saw?
- My tips for using a table saw
- Take action.
Last updated on March 22, 2026 2:30 am
What are the different uses of a table saw?
According to Aaron Barnett of BangingToolbox: A table saw is big business, with higher risk comes a higher reward.
If you’re wondering – what do you use a table saw for? then these are popular cut ways of using a table saw that you could be utilizing to increase your building and DIY capabilities.
- Rip cuts. Table saws are great for ripping or cutting wood along the wood grain. And a well-set-up table saw can do so at great speeds and with a high degree of accuracy and time efficiency.
- Straightening board edges. With the help of a table saw’s fence or miter gauge at 90 degrees, you can straighten board edges easily and accurately.
- Beveled rip cuts. By changing the angle of the blade with respect to the table surface, you can make beveled rip cuts.
- Cutting joints. Table saws can be used to cut more complex wood joints like rabbet, dado, and shiplap with ease and speed.
- Kerfing. The guides on a table saw can help you cut thin strips of wood with consistent thickness all throughout what’s needed to kerf.

Materials you can cut with a table saw
- Softwood. These durable yet more sustainable wood types are the most common types of wood that can easily be cut with a table saw.
- Hardwood. The tougher and denser wood is, the more difficult we find cutting by hand or with a circular saw becomes. A higher-powered motor and the larger blades of a table saw make short work of this.
- Nonferrous metals. Metals like Aluminum can be safely cut with a table saw, provided you use a blade made to cut this type of material with a high TPI (Teeth per inch) while taking all the necessary precautions like wearing safety glasses.

Parts of a table saw you need to know
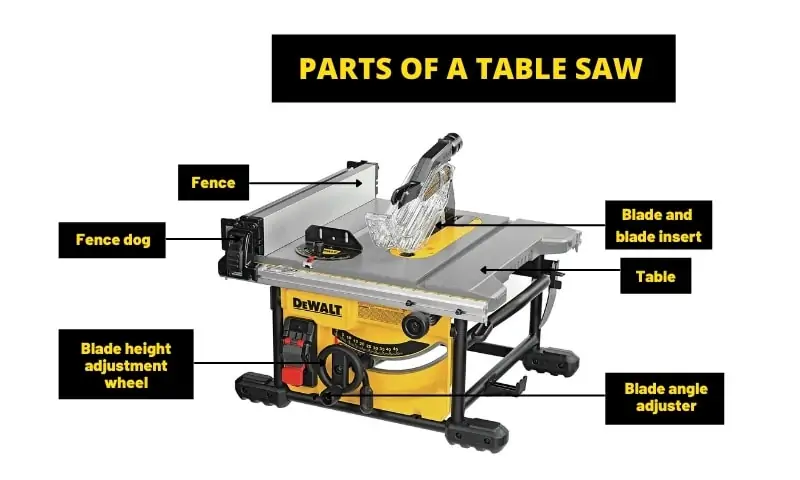
1. Power button
The master switch turns on the electric motor powering the saw blade.
Smaller blades have a toggle switch that turns the saw on or off, and bigger table saws have bigger buttons at the lower end of the table to be safely reached by your knee in case of an emergency and the need to stop the saw while your hands are busy stabilizing your work.
2. Table
Provides a smooth and flat surface to work on and ‘slide’ material towards the blade.
Cleaning is crucial so that the tabletop maintains a flat and even surface. This will affect the quality of your cuts, and help avoid sticking or the chance of kickback.
3. Fence
A perpendicular panel or stop that guides workpieces to make accurate straight cuts.
The fence can be moved closer or pushed further away from the saw blade to adjust the cutting width.
4. Fence dog
This part refers to the lever that locks the fence in place.
This is crucial as a moving fence is practically useless and can be an added hazard if unintended movement happens while in operation by accident.
5. Blade
There are different types of blades that you can attach depending on the specific job that needs to be done.
Ripping framing or ripping finishing trim.
6. Blade insert
Also known as the throat plate, the replaceable panel provides an opening for the saw blade to protrude through the table surface for replacement or removal of the blade.
Being removable, the insert provides access to the arbor when replacing blades.
7. Blade angle adjuster
This helps set how much the blade is angled and is helpful when doing bevel cuts.
8. Blade height adjustment wheel
As the name suggests, this dial is responsible for changing the height of the blade.
This is essential to ensure that the saw will be able to cut through pieces of wood of varying thicknesses.
Ensure safety while working with a table saw
What are the dangers of working with a table saw?
Kickback
This is characterized by the workpiece suddenly jerking back towards the operator at a high speed.
This happens when the material gets caught or snags on the back of the saw blade.
Blade injuries
If you work without wearing the proper protective gear or disregard the correct protocols, you’re at risk of getting and injury.
Even the most experienced woodworkers have an accident so we stress that it is critical to always be confident in what you are doing.
Mishandling a table saw could lead to an amputation, so proper training from a qualified carpenter is required before operating one.
Electric shock
Be sure to plug in your saw at a ground-fault circuit interrupter (GFCI) outlet when working.
GFCIs work by detecting any sudden change in the electrical current and cuts the power automatically before there’s a possible risk of electrocution.
Dust inhalation
Cutting a large volume of wood in combination with a fast-spinning saw blade makes the blade expel a lot of sawdust.
If inhaled, this dust can irritate the lungs [1], causing difficulty in breathing or even leading to certain respiratory diseases.
When cutting wood remember the importance of wearing a dust mask, so small wood chips don’t enter your lungs.

How to work safely with a table saw?
- Avoid wearing loose clothes that can get caught on the saw blade.
- NEVER wear gloves [2]. While there is a risk of cutting your skin, gloves introduce a bigger risk of latching onto the saw blade and possibly causing more serious injuries.
- Wear your protective goggles to protect from small, ricocheting material debris and from kickback.
- Share your building and DIY me-too solution to show other carpenters and DIY’ers that you have a safe power saw in your garage with an emergency brake that stops automatically on contact with human skin.

How to set the blade height?
Learning how to use a table saw involves setting the blade to the right height.
- Locate the blade height adjustment wheel. Determine which turning direction (clockwise or counterclockwise) moves the saw blade up or down.
- Take your workpiece and position that DIY dream next to the blade.
- Raise or lower the blade accordingly so that the gullet (the groove in between the blade’s teeth) is at the same height as the workpiece. Another rule you can follow is to raise the blade around ⅛” higher than the workpiece.

How to set the guide rail position?
Learning how to use a table saw to cut logwood includes getting to know the guide rail well. Some rail guides are not well designed or have become too loose from too much use.
A well-functioning rail guide is what makes the best table saw in my experience, along with all the must-have safety attributes.
- Locate the fence dog and loosen and unlock the guide rail/fence. This lets the fence to move freely from side to side.
- Set the fence at an appropriate position for your cut. You may need to raise the blade to get accurate measurements for good alignment.
- Lock the fence using the fence dog.
- Check if the fence is square and make small adjustments by tapping the fence with your knuckles.

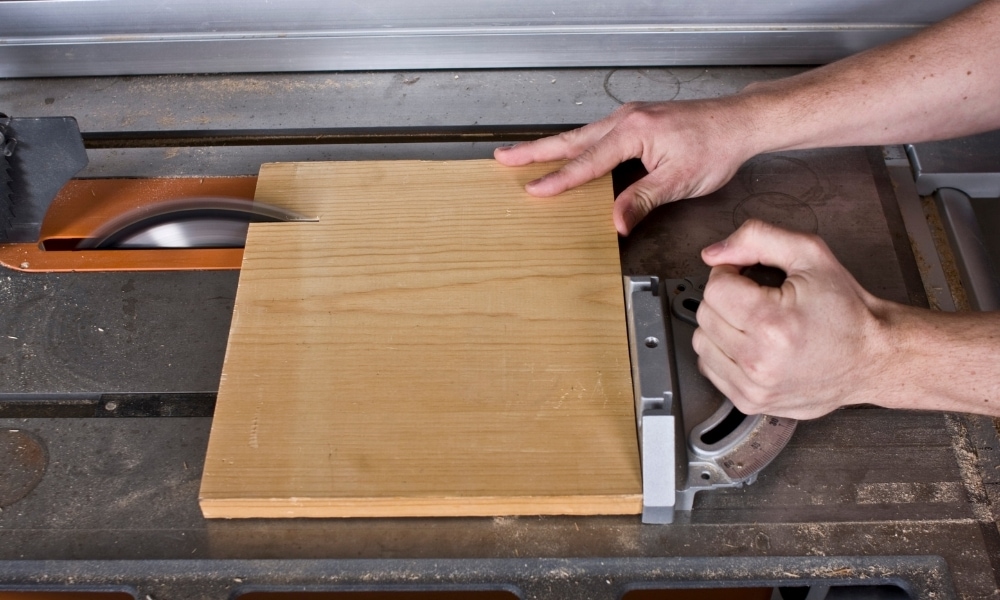
How to secure the wood on the table saw bench?
- If you’re cutting a big sheet of material such as plywood or MDF, you may want to attach extension wings to support your workpeice.
- Make sure that the fence or miter gauge is locked in place.
- Hold the wood firmly against the fence or miter gauge with both hands.
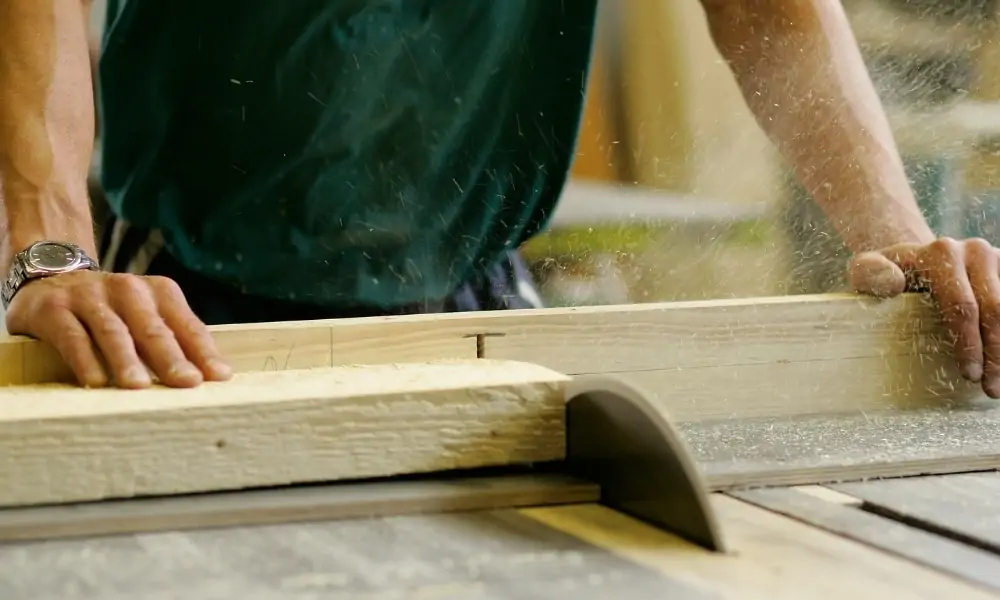
How to feed the material into the blade?
- Adjust the fence and the blade height according to your needs.
- Turn on the table saw and place the workpiece against the fence. Don’t apply too much force as the fence may misalign and back-spring which can dangerously cause the material to kick towards you.
- Slowly slide in your material, feeding the wood into the blade as to make your desired cut.
- After completing the cut, turn off the table saw before removing the scrap wood.
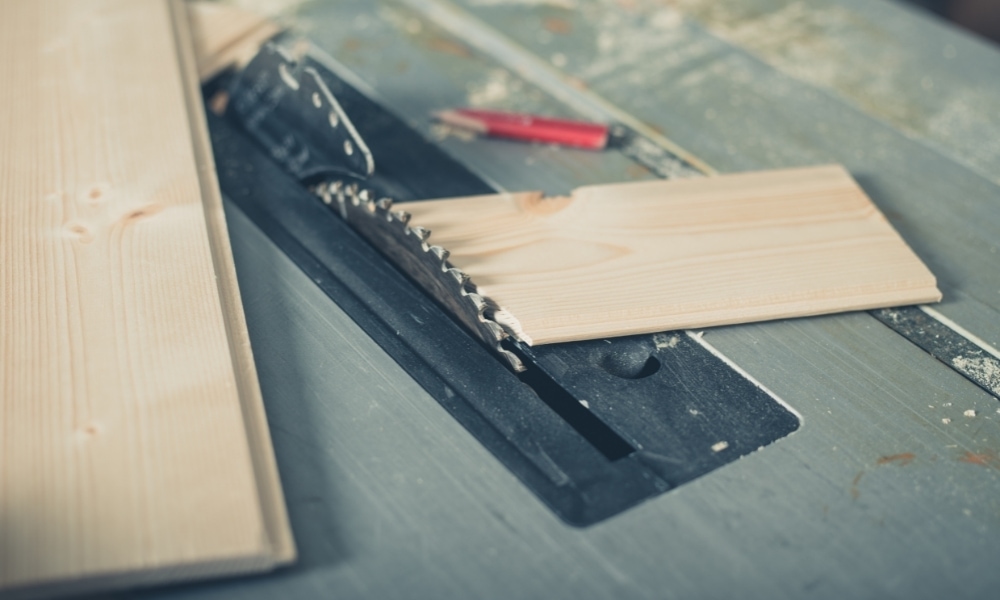
How to make crosscuts with a table saw?
- Acquire a miter sled or gauge. This will help you push the material safely and smoothly.
- Place your workpiece against the sled and align your piece to be cut against the blade.
- Now set your desired position for the cut.
- Once the saw is on, push the wood using the sled and secure your workpiece with your hand. Be sure to avoid putting your hand too close to the blade.

How I make angled beveled-cuts?
Using a table saw to cut angles is more effective with a miter gauge.
- Make sure that the saw is properly aligned with the fence and miter gauge.
- If you are using a zero-clearance insert, you’ll want to replace the cover with a wider slot to be compatible with angled cuts.
- Using the blade angle adjuster level, angle the surface of the tabletop to your desired bevel angle.
- Start the table saw and feed the material into the blade.
- Turn off the table saw and remove the scrap wood.
This cut is much better done with a miter saw.
How I cut joints using a table saw?
You can cut joints when you know how to use a table saw properly.
Dado
- Remove the blade insert and insert a dado blade. This is a special type of blade made out of two circular blades separated by a set distance.
- Replace your blade insert with one that accommodates your dado blade.
- Set the fence, or miter gauge, and blade height according to your needs.
- Turn the table saw on and feed the material into the blade.
- After cutting, turn off the table saw and chisel off the material between the now-cut dadoes.
Rabbet
- Replace the blade and the insert just as you would when cutting a dado joint.
- Set the fence or miter gauge distance accordingly. The outer blade should be touching the material’s edge and the inner blade is the one that will be cutting.
- Turn the table saw on and feed the material into the blade.
- After cutting, turn off the table saw and chisel off the material between the now-cut rabbets.
Shiplap joints
- Attach a dado blade to the saw insert. Make sure that the saw is unplugged before doing this.
- Fasten a sacrificial wooden plank along the fence. Mark the plank with your intended blade height.
- Adjust the fence so that the width is the same as your intended shiplap.
- Raise the blade up to the mark on the plank.
- Turn on the table saw and make the cut. Do the same thing for the next plank and check if the two pieces will fit.
And if you’re really into wood joinery, here are more wood joining techniques you should learn.
How I cut kerfs with a table saw?
- Attach a miter gauge. This will help you maintain equal measurements for the gaps in between each cut.
- Raise the blade to your desired height.
- Adjust the fence to match your intended gap measurement. Be sure to lock the guide in place after so that nothing moves while you are cutting.
- Turn on the saw and feed the material into the blade.
- Unlock the fence and adjust the rail again, maintaining the initial gap measurement. Repeat this as many times as needed.

But if you want to try all these cuts but with a limited budget, you can do so without power tools.
My tips for using a table saw
If you’re having trouble keeping the material firm on the fence or miter gauge, use a feather board to get a straighter and more consistent cut.
Additionally, you can clamp on a longer fence or attach one on your miter gauge so that you have more support for any kind of cut.
Take action.
Whether you are a beginner or an experienced woodworker, a table saw is definitely something you should have in your workshop because of the added versatility, speed, and efficiency when ripping accurate cuts in timber, compared to a circular saw.
The great almighty table saw is the king of the workshop and helps make clean and precise cuts into a number of different types of wood and aluminum.
With a large blade and a powerful motor, the saw makes the challenge of mowing down thick and heavy lumber like cutting a piece of cake.
Safety should be a big concern here, you can consider a SawStop that retracts the blade if the machine senses any possible contact with your finger or human skin. (Follow the link above or below in the image).

More information:
- Wood dust-health effects, a publication from https://www.ccohs.ca/oshanswers/chemicals/wood_dust.html
- Two dozen table saw safety tips, a blog from https://www.woodcraft.com/blog_entries/two-dozen-table-saw-safety-tips


