
- Jointing FAQs
- What types of joints can you do with a biscuit joiner?
- What types of joints can you do with a biscuit joiner?
- How to use a biscuit joiner for joining wood edge-to-edge?
- How to use a biscuit joiner to join face-to-face joints?
- How to use a biscuit joiner to glue mitered corners?
- What other methods and tools can join wood instead of a biscuit joiner?
- Expert tips for using a biscuit joiner
- Here’s a rundown on using a biscuit joiner.
Last updated on March 23, 2024 9:56 pm
Jointing FAQs

Where to use a biscuit joiner?
A biscuit joiner is used for gluing wood edges, joining miter joints,gluing butt corners, and aligning wood pieces.
Who uses a biscuit joiner?
Biscuit joiners are used by cabinet and furniture makers, carpenters, and woodworkers.
Any ways I can join wood pieces aside from using biscuit joints?
Yes. You can use other joints like tongue and grooves or dovetail joints cut with a plunge router.
What types of joints can you do with a biscuit joiner?
According to Aaron Barnett of BangingToolbox: A biscuit joiner works by engraving an exact-sized biscuit-shaped hole on wooden boards you plan to join.
The biscuit-shaped piece of MDF is inserted into both slots to expand tight when mixed with glue for fast, and strong carpentry joins.
So, why use a biscuit joiner? A biscuit joiner provides extra support and binding to your woodcraft projects for faster and stronger woodworking connections.
Compared to only using wood glue, a biscuit joiner lets you bind two wooden objects easily and much quicker than using wooden dowels.

What types of joints can you do with a biscuit joiner?
1. Edge-to-edge joints
An edge-to-edge joint is done by connecting the edges of two wooden boards. Most commonly, an edge-to-edge joint can form a corner.
A biscuit joiner acts like an arm pulling the two wooded planks together.
It creates enough tension in the joint that prevents the boards from moving out of place or disconnecting when the glue dries.

2. T-joints
As the name implies, a T-joint connects two planks of wood that resemble the letter “T.”
This style of joining works by combining and joining two pieces of wood to form a 90-degree angle on both sides.
In addition, a biscuit joiner can be used as a fastener for a T-joint. For cutting in the middle of the board, you can use clamps to hold a block of wood in place to act as a fence guide.

3. Miter corner joints
Using a biscuit joiner for picture frames is common for woodworkers.
A miter joint is formed by connecting two timber boards cut at 45-degree angles on the joining edge.
And can look much better than simply butting two pieces of wood together for a corner joint, as a miter hides the end grain of the wood.
This can be done by connecting the two woodblocks, which both include a 90-degree angle corner cut on a table saw. This joint is commonly seen in picture frames and canvases.

4. Butt corner joints
A corner joint connects the end of two pieces of wood to form an L-shape.
Butt joints are typically weak because you are joining the timber’s end grain and only relying on glue, so using a biscuit joiner enhances the connection and reinforcement [1].
This type of joint is commonly seen in tables, chairs, and frames.
There are numerous variations that you can do using a biscuit joiner.
Now that you know what joints you can make with a biscuit joiner, it’s time to find out how to use a biscuit plate joiner for each type.
How to use a biscuit joiner for joining wood edge-to-edge?
Most times, using a biscuit joiner is to secure two edges of timber boards securely. Here are the steps for gluing two wooden edges together with a biscuit joiner. Here are the steps to using a biscuit joiner for edge joining boards:
Step 1. Mark both ends of the wood that you plan on connecting.
Mark the center of the edges that you plan on connecting and the spacings to position each biscuit join.
This will help you identify the position of the hole and where to engrave the join on both edges
When you put the pieces together, the holes should line up perfectly.
Use a sliding square and a sharp pencil to mark the depth and center point.

Step 2. Engrave the biscuit holes as a mirror in both pieces.
Plugin and position your trusted biscuit joiner and start to cut out each slot on both edges of your wooden boards using the machine set to the right depth for the sized biscuit you are using.

Step 3. Do a test fit.
Choose the biscuit according to the size you set on your machine and do a test fit of all biscuits holding all corners and edges together that you will glue to make sure every hole is lining up and all is fitting how you expect it.
If you apply all the glue and then find out one hole needs slight adjustment to get your edges to line up perfectly, otherwise, you can get a sticky mess on your hands.
So wait until you know everything is fitting perfectly before applying wood glue.
Step 4. Bind the wood by adding glue.
Now that you are ready, secure the joints by applying transparent drying wood glue all over and around the holes that the biscuits will be inserted.
Additionally, soak the biscuits in glue so that the MDF can absorb the moisture. And lastly, put the glue on the actual edges themselves.
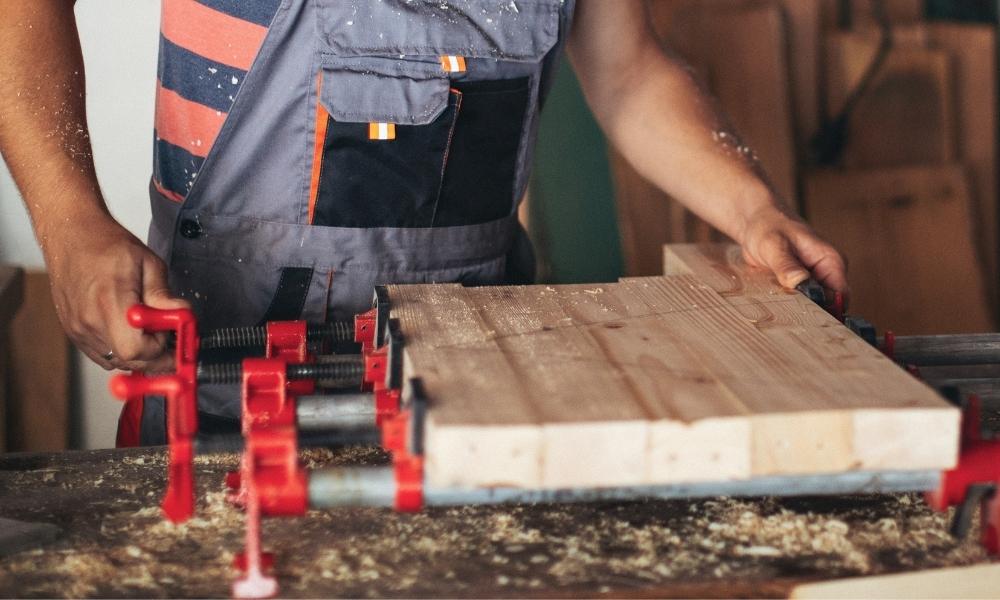
Connect all the pieces together with quick-release clamps like the Bessey clamps to hold everything tightly together, forcing the glue to squeeze out of the joins.
Wipe down the wood so that any drips made from the glue are removed.
Step 5. Wait for the glue to dry.
Lastly, keep all your pieces clamped together until the transparent wood glue has had plenty of time to dry, knowing that you are safe to remove the pressure applied from the woodworking clamps.
Here are more ways to join wood together end-to-end.
How to use a biscuit joiner to join face-to-face joints?
When joining two wooden boards face to face to make a wider top for a table, for example, you basically follow the same method but instead, you have to push back the fence on the biscuit joiner to give the tool access to a large flat surface.
You should find other ways to secure the position before cutting.
Step 1. Mark the joining locations in the wood that you plan on connecting.
Like joining edge to edge first, mark your wood with top, center, and bottom lines.
If your pieces are large, you might want to add 2 or 3 center lines and so on to have a stronger join.
Decide what spacing along the center lines to put each biscuit. Make sure to copy the same pattern exactly on both pieces like a mirror image.

Step 2. Engrave the slots for the joint.
Using your biscuit joiner machine, engrave every hole accordingly in an exact mirror to the corresponding piece of wood. Make sure to pull the biscuit joiner fence back to suit cutting on a flat surface.
If your biscuit joiner doesn’t have its own clamping system for this, you can use your wood clamps and a small straight edge to create a guide to slide and hold the cutter in place while making each cut.
When you are ready, rev up your bad boy to full speed and make the plunge to the full depth as required.

Step 3. Insert your biscuits into the slots made
Do a test fit by placing each biscuit in the holes you’ve made according to the size you’ve used in your machine.
Do a test fit again and make sure that all is fitting nice before gluing everything together.
Step 4. Secure the pieces of wood in place forever!
Once done, place clear wooden glue all over the face, inside the biscuit holes, and on the biscuits before inserting the biscuits again and clamping both faces of timber slabs together.
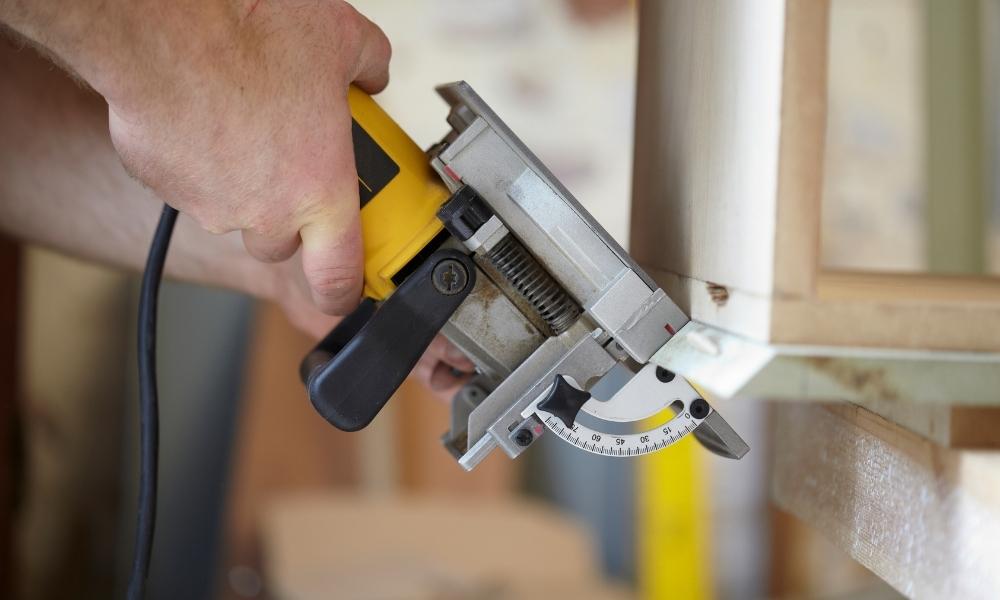
How to use a biscuit joiner to glue mitered corners?
When using a biscuit joiner to create miter joints, the main difference is that you need to set the tool to cut on a miter. Likewise, you must cut closer to the inside edge of the corner rather than in the center.
This is to keep the biscuit joint concealed and to provide maximum strength to the miter joint. This is how to use a biscuit joiner at 45 degrees:
Step 1. Position your wood accordingly.
Cut the corners of your boards at a 45-degree angle using a table saw, hand saw, or miter saw. Check that the two pieces of wood fit in a friendly manner that forms a 90-degree angle without any gaps.
If your miter saw is old or damaged, you might have to adjust the pre-set 45-degree angle lock to get the position right.
Make a second cut and make sure all four corners are fitting perfectly.
Step 2. Mark the position of the biscuits.
You will need to mark the position of the biscuit tight to the inside edge, of the corners so that the biscuit cut won’t protrude from the other side and to the best strength.
Use your favorite ruler and sliding square for this, and make sure that your pencil is sharp.
Step 3. Engrave the biscuit joiner slots into the end grain.
Now, adjust the angle of your biscuit joiner to 45 degrees and engrave each hole in the end grain of the wood, maintaining stability by using bench clamps, a workmate bench, or another clamping system.
Wear your earmuffs and extract the dust properly.
Step 4. Do a test fit.
Place the appropriate biscuits into all the slots and connect the two or four corners together to make sure everything fits in perfectly.
Make any adjustments as needed as you go.
It will require a little more skill to get the corners tight compared to simple butt joining timber edges.
Having a quality miter saw that cuts perfectly each time can make all the difference and will save you a lot of wasted time compared to an old saw not cutting miters accurately that needs constant fine-tuning and adjustment.
Step 5. Secure and glue the corners in place.
Before applying wood glue:
- Do another test fit and rehearse how you plan on connecting them.
- Apply wood glue, place the biscuit, and join the two miter joins together.
- Secure the pieces firmly in place by using quality wood clamps.
- Keep the clamps secure until the glue has had time to dry.

What other methods and tools can join wood instead of a biscuit joiner?
1. Drills and dowels
Sometimes a biscuit joiner is not needed to secure the wood in place for small jobs.
Even though dowels are a little harder to align and get an accurate join, the dowels are still fast and secure.
Dowels can be used to create tight joints between pieces of wood for good horizontal load support like biscuit joins instead of just edge-to-edge gluing.

2. Dovetail saw
People use a dovetail saw to create dovetail joints – one of the most visually appealing types of carpentry joints.
A dovetail saw is a precise cutting tool that helps you create crosscuts by hand for smooth cut edges. Along with a biscuit joiner, you have two types of jointing methods to make seamless joints.

Dovetail joints take a lot of time to get right, but the process is fun and enjoyable.
This decorative join is great for corners that are visually seen. Use this type of join on jewelry boxes and small craft projects.
Biscuit joints are strong and fast to manufacture; however, any visible corners won’t have the traditional woodworking look for small craft projects.
Use both types of joins depending on the situation and what you require for strength and aesthetics.
3. Finger joints
In a more simple form of a dovetail joint, a finger joint looks good but not as good as her better-looking sister.
Both require a similar skill level and time to craft in a nice way, but a dovetail is a stronger hold. She can be easier and looks much better.
You will need a dovetail saw for making your cuts fine and accurate. Regular crosscutting hand saws from the hardware stores are too ruff and messy.

Expert tips for using a biscuit joiner
1. Store your biscuits in an airtight container.
Biscuits are prone to expand when exposed to moisture and heat.
Store your biscuits in an airtight bag or container to prevent moisture in the air from expansion and water damage.

2. Always do test fits.
Always use biscuits that snuggly fit in the holes you’ve made. This way, you avoid loose joints when connecting woods [2].
3. Use double biscuit joints for extra strength.
If your joint is made to handle a bit of stress, you can use more biscuit holes and joins to strengthen the joins.
4. Use a tool with the right adjustments.
Not every biscuit joiner is equal. Make sure you have a biscuit joiner tool that is quick, easy, and accurate at setting and making position adjustments.
You want to be able to rely on the angle you set your tool at to hold while working without movement.
The fence needs to hold the tool securely while you widen each slot to the required size.

5. Wear PPE.
Make sure to wear earmuffs to protect your ears when operating a biscuit joiner.
In addition, wear a dust mask to avoid breathing in any wood dust. You can connect most biscuit joiner tools to your workshop extractor or Jobsite vacuum to remove the dust as you are working.
6. Tips for marking both boards.
You can put boards side by side to transfer the center lines from one to the other using a T square to transfer the lines across the boards.

7. Don’t go too deep.
Make sure that the thickness of your workpiece can accommodate the depth of the biscuit so that you do not break through to the other side, damaging your project.
8. Consider going cordless.
Cords can get in the way when operating a corded biscuit joiner, and cordless models are a breeze to use!
If you already have batteries for your favorite cordless tool brand, you can consider just getting a bare tool and working more freely in your workshop.
Here’s a rundown on using a biscuit joiner.
So the next time you think of nails or screws to join wood, there’s a better way to make seamless woodworking joints that I like.
Operating a biscuit joiner is relatively easy and safe compared to many other power tools I find; however, you still have to be mindful of the blade when the tool is operating.
Taking advantage of a biscuit joiner is most beneficial when you have repetitive wood joins to connect for indoor carpentry work, and you want to make the joins fast while having a strong joint.
You can assemble even your money-making wooden crafts with a biscuit jointer more quicker.

More information:
- The different types of joints explained and published by https://www.diydoctor.org.uk/diy-how-to-type/joinery-carpentry-woodwork/timber-joints-cuts.htm
- Using a biscuit joiner, an article published by https://www.wwgoa.com/article/using-a-biscuit-joiner/


