
- Wood gluing questions
- The mighty strength of wood glue.
- What furniture can be fixed together with wood glue?
- Choosing the right type of wood glue
- How to prepare a wooden surface for glue?
- Prepare your clamps to hold steady until done
- Consider the addition of a biscuit join or dowel
- Applying the wood glue
- Connecting different wood pieces
- Waiting for setting and glue drying time
- How to add strength to glued edges that have applied force?
- Why biscuit joiners are time efficient and strong with glue?
- Gluing tips and tricks
- Mastering joinery with glue
Last updated on September 28, 2022 2:34 am
Wood gluing questions

Which wood pieces work well with glue?
Use wood glue for joining 2x4 wood pieces, wood panels, woodworking joints, furniture wood pieces, tabletop panels, and chair rungs.
What else do I need when gluing wood together?
You will need a clean working tabletop, scraper, woodworking clamps, and power sanders.
How long to leave my clamps when gluing wood?
If you have the ideal matching wood pieces (moisture content of not more than 8%, the temperature of 70 to 80° F, and 40-60% humidity), you can leave the clamp pressing on for an hour. For greater pressure strength, leave them for up to 24 hours.
The mighty strength of wood glue.
Aaron Barnett of BangingToolbox suggests: Whether you are a pro woodworker or a fanatic, knowledge about gluing wood together is important for us as an important part that determines the end result of our projects.
From working on a wooden DIY project to repairing a broken table, there’s no greater nightmare than working through the details for days, then watching the project fall apart because it was improperly glued.

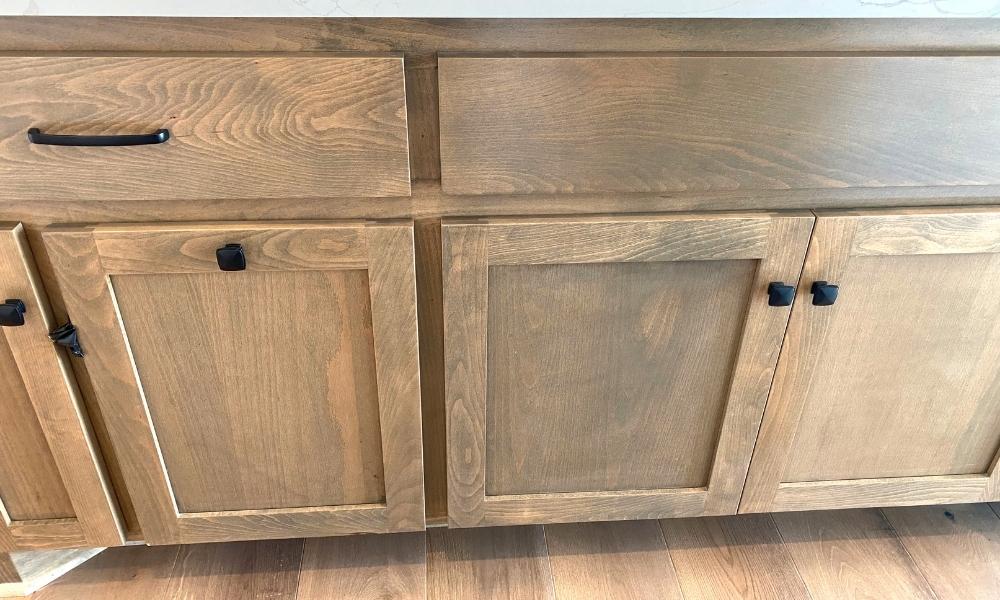
What furniture can be fixed together with wood glue?
You can also use wood glue to stick wood together just how you want.
Since the glue is designed to create a firm bond between wooden surfaces, wood glue is ideal for joining wooden joints, antique furniture, panels, and broken wooden pieces.
Furniture joints you don’t need to disassemble later like a kitchen cabinet or a bookshelf all fall into this category.
From woodworking furniture meant to hold lightweight furniture like TV stands or grocery racks in the kitchen, pantry glue has a place in every area of your home when woodworking requires strengthening wood joins.
Choosing the right type of wood glue
1. PVA glue
Benefits of joining wood with PVA glue
- PVA glue is odorless and can be used for indoor-related work.
- When wet the glue can be wiped with water and a rag without the need for harsh chemicals.
- We find most quality types dry up easily and don’t turn yellow over time.
- Expect a strong durable hold.
- Not toxic to work with.
Uses of PVA glue
- Gluing wood for indoor projects.
- Binding book covers.
- Art projects.
- Connecting leather for the craft.

2. Polyurethane glue
Benefits of PU glue
- Polyurethane glue forms a strong bond.
- Does not require clamping, hence it saves time.
- Can withstand wear and tear over time.
- Is waterproof.
- Doesn’t require mixing with other types of solvents.
Where to use Polyurethane glue?
- Bonding building materials.
- Attaching components to wood.
- Joining parts of outdoor furniture.

3. Hide glue
Why use hide glue to join woods?
- Can be reversed by heating the joints.
- Is not toxic because of the base.
- Easily washes off from clothing.
- Does not normally clog up tools.
- Transparent when dry making a clear and clean finish.
What projects to use hide glue?
- Joining indoor furniture pieces.
- Making antiques.
4. Epoxy
Reasons to use epoxy for gluing wood
- It is waterproof, hence the best for both indoor and outdoor projects.
- Can make rotten parts of wood reusable for a longer time.
- Spreads, so only a small amount is used at a time.
- When epoxy dries, the results leave no residue.
Where to use epoxy?
- Glass repairs because of the hardening nature.
- Jewelry making.
- Filling chips and gaps in heavy-duty work.
- Gluing plastics, wood, and metals.
5. Superglue
Benefits of using super glue
- The versatile nature makes this compatible with porous and nonporous items.
- Requires no mixing before usage.
What projects to use super glue?
- Fixing broken furniture.
- Decorations.

How to prepare a wooden surface for glue?
The wood surface needs to be clean and free from any old glue. Wipe away all dust particles and dirt.
If stubborn grime persists on the surface, use light grit sandpaper or use rubbing alcohol and wait about 3 minutes for the chemicals to evaporate.
For old stuck glue, use a chisel, knife, or paint scraper to scrape the hard drips away.
Old glue weakens the strength of new glue, so you must remove past remnants from sight.

Prepare your clamps to hold steady until done
For loose pieces, use wide C-shaped clamps because the jaws easily reach over to secure different pieces together.
If some pieces don’t need much pressure you can use thick rubber bands to keep the pieces together.
But when serious holding is needed on large pieces, get multiple clamps so that glue can dry evenly.
G clamps, C clamps, and quick release clamps do the trick.

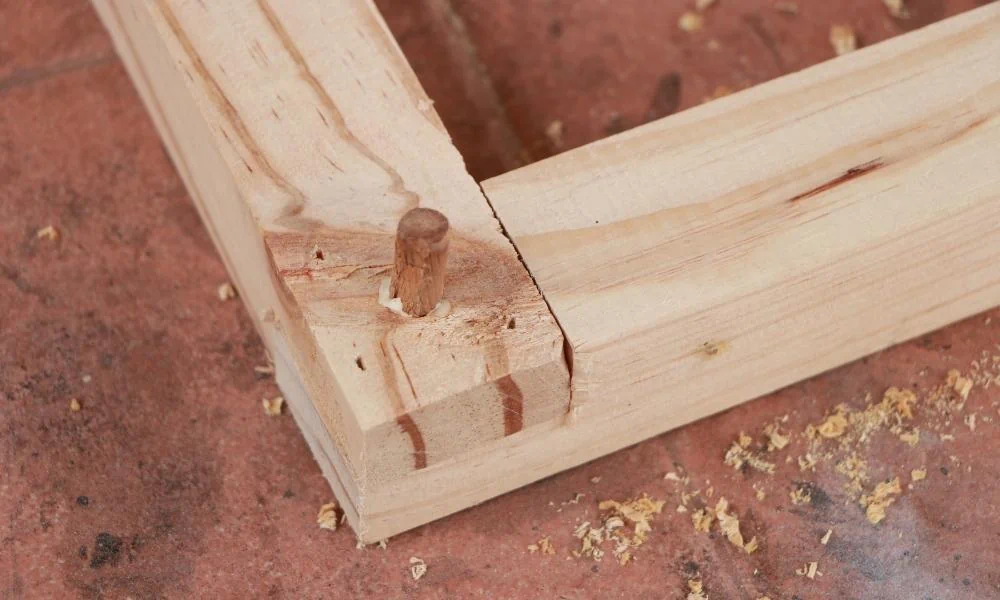
Consider the addition of a biscuit join or dowel
If you require more added strength to your glued joins you can strengthen joins up with additional support.
Wooden dowels work by drilling and installing the dowel [1] at chosen spacings.
The same can be done with a biscuit joiner, achieving a similar strengthening result much faster.

Applying the wood glue
Apply the wood glue using a brush or by using a scrap piece of wood to ensure the spread is even over the entire wooden surface.
Also, to give a firm grip without glue spilling over the edges or there having areas joined with no glue reducing the strength of the join.
Using a brush works like painting in ensuring a uniform spread. If there are parts that are unreachable, use the paddle end of a brush.
You can also rotate both pieces of wood to be glued in a figure 8 pattern, to spread the glue more evenly on the edges for a stronger connection.

Connecting different wood pieces
A. Connecting 2×4 flat surfaces
- Using a bristled brush, spread a layer of glue on the surface.
- Press the pieces of wood together to join.

B. Connecting large wood panels
- Using a brush roller or a long piece of scrap wood, evenly apply a thin layer of glue on the surface.
- Press the panels together to connect.

C. Connecting woodworking joints
- Using a brush, apply glue inside the joint.
- The glue will need to spread evenly on the entire joint ensuring that everything remains strong.
- Quality clamps will keep your woodworking joints looking tight and professional when the glue dries, without any gaps.
D. Repair chair rungs
- Due to their small sizes, the glue can be hard to get in the right spot.
- Using a syringe, pour glue into the holes.
- Press the rungs in and out with a twisting motion for an even spread of the glue.
E. Connecting tabletop pieces
- Pour glue on the edge of one slab of wood in a zigzag shape.
- Spread out the glue using a scrap piece of wood or an old brush.
- Press the edges together and move the two surfaces against each other in a small figure 8 motion.
- Hold the glued boards together using two or strong winch-style clamps.
- Add another clamp on top of the tabletop with a straight edge to provide even pressure and to stop twisting for a flat tabletop surface.
- Wipe away any squeezed-out excess glue.
Here are some tips for gluing wood together:
You can add extra pressure with small strap wrenches used to hold things down on a truck; also pipe clamps, or better a quick-release g or h clamp, with a long enough extension.


Waiting for setting and glue drying time
Wood glue requires enough time to set and dry before removing any clamps. After application, do not wipe out excess glue immediately.
For chemical glues like polyurethane, glues leave excess glue for about 30 minutes then use a knife to remove drips to avoid smudges.
Always securely clamp wooden pieces together until the glue dries.

How to add strength to glued edges that have applied force?
1. Dowels
- Drill dowel holes with the right-sized drill bit on both edges in alignment with each other.
- Pour glue into the dowel holes.
- Insert the dowels into the holes.
- Cut and sand off protruding dowels if the lengths are too long for connection.
- Glue the joints together like normal.
- Use clamps to hold everything tight.
2. Biscuit joins
- Identify and mark points where the biscuits will be installed.
- Cut enough biscuit slots as needed and clean the slots to remove dirt and debris by using an electric blower or workshop vacume.
- Fill each biscuit slot with enough wood glue
- Put the biscuits into the slots and wipe out any excess glue.
- Align and fit the wooden boards together like normal.
- Clamp tightly and leave for the glue to dry.

3. Dovetail joins
Dovetail joins provide a considerable amount of strength because once assembled, the wood cannot be twisted [2].
This joint is shaped in a way that makes it impossible to pull pieces apart.
The large gluing surface area also offers even more strength to the woodworking join made from carving dovetails.
Dovetails can be used to show off your woodworking skills.
4. Finger joins
With finger joins, the chances of twisting are reduced because the joint is made up of many interlocking blocks held together with glue.
Here are more ways to join wood.
Why biscuit joiners are time efficient and strong with glue?
Biscuit joiners save time because there is no need to measure the holes and joints. As the tool works as a gauge at the same time to set the depth.
The cuts are simple to make. Therefore, many biscuit joints can be made in a short period of time.
Due to the number of holes that can be made in a short period of time, the method offers more strength than fewer manual woodworking joins.

Gluing tips and tricks
- Dry wooden surfaces do not bond. For better results, evenly spread the glue.
- Excess glue pouring out of a joint means there’s no area lacking glue, this is a first class sign.
- Each glue has a special drying time depending on the manufacturer. Some take 20 minutes while others take 12 hours or more to dry up.
- After you join large timber slabs, running over the joins with a belt sander makes for a fast clean surface if the surface is not perfectly flat and smooth yet.

Mastering joinery with glue
Gluing small pieces of wood together is pretty easy and so is gluing larger panels.
With the right adhesive, you can never go wrong in achieving your dream project connection.
Provided you read the manufacturer’s instructions on your glue packaging and spend quality time with your work, you are guaranteed an excellent outcome.
Most importantly after you choose the right type of glue for your join remember that the more surface area that the glue covers the stronger the join will be.
So make sure to spread your glue like grandma’s jam on your toast.
And for extra strength consider opting for a biscuit join and use clamps, rubber bands, or straps to hold everything secure until this wet stuff dries hard.

More information:
- Drilling dead-on dowels, an article from https://www.woodmagazine.com/woodworking-tips/techniques/drilling-boring/dowel-joints
- All about dovetail joints, published by https://www.finewoodworking.com/2005/09/12/all-about-dovetail-joints


