
Last updated on March 23, 2026 9:23 am
Need to work your way on mortising bits?
When you first want to make mortises for your tenon joint or when you simply need to cut square holes, you have to know the details of how the mortising machine works first.
Aaron Barnett of BangingToolbox suggests: The hollow chisel mortiser is a specialized cutting machine that only cuts square holes in wood. But to do the job efficiently, you need a special mechanism to make the square cut.
The square hole drill bits or mortising bits are a two-piece mechanism creating perfectly-cut square holes.
If you want to know how to use the square hole bits on a mortising machine, keep reading.

How do the hollow chisel and auger drill bits work?
Before we teach you how to set up your square hole drill bits, understand how the square hole drill bits work.
The two-piece mechanism contains a hollow chisel bit where the auger drill bit is inserted.
When activated, the auger bit rotates downward, with the spiraling edges removing the material.
Meanwhile, the hollow chisel plunges into the wood simultaneously to cut the square holes.
As it cuts down through the piece, the wood chips removed by the auger bit find a way to the hollow chisel opening.
The drilling for square holes is a continuous process until the cut is finished into your desired depth. The longer you pull the lever down to make deeper square hole cuts the deeper they will be drilled.
This process is pretty straightforward and easy compared to the other ways to cut mortises.
The chip clearance
The chip clearance is the extra space or gap allotted between the tips of the hollow chisel and auger bits.
This space provides clearance or room for the auger bit to push the wood waste to the chisel slot.
Also, the clearance helps the two bits move smoothly and reduce metal-to-metal contact by providing more cooling and lubrication between the bits.
Without this clearance, friction could damage the mortising bits or your mortising machine.
This clearance is so little but meaningful. And could be anywhere from 1/16 to 3/32 of an inch.
It depends on the power of your machine, the sharpness of your bits, and the density of the material.

How to set up & use square hole drill bits on a hollow chisel mortiser?
Setting up square hole drill bits on a mortiser is pretty straightforward compared to setting it up on a drill press machine.
In a drill press, you’d still have to set up a working table and a mortising attachment aside from the mortising bits.
Step 1 Attach the square hole drill bits.
Choose the right-sized square hole drill bits. To insert the mortising bit assembly, simply insert the right-sized bit for your needs into the bushing intended to hold your bit.
You can easily spot it because the chuck is above the chisel holder. Insert them together into the hole.
Use a small piece of wood on the tip of the bits so that you don’t have to hold the sharp tips. Push the bits up until the end of the auger bits touch the chuck.
In this stage, you must provide the chip clearance we mentioned earlier.

You can use a spacer, a dime, or a washer in the shoulder of the chisel holder and the hollow chisel bit. This way, the hollow chisel creates a clearance with the auger bit.
Tighten up the screws on all holes of the chuck that hold the auger bit.
After this step, remove the spacer you used to provide clearance and tighten the knob or screw on the bushings holding the hollow chisel.
It’s time to square the hollow chisel.
Step 2 Square the hollow chisel with the fence.
Squaring the hollow chisel with the fence helps achieve accurate and precise square hole cuts.
Doing this will help ensure that the square holes you cut are consistently aligned as you move your wood piece sideways and up and down.
At this phase, you ensure the hollow chisel is perpendicular to the fence.
To be perpendicular means that the chisel bit is not facing a different angle from what the fence is at.
The drill bit should not be shaky and follow the fence alignment.
To do this, you have to lower the mortising bits to half of the height of the fence so you can judge their alignment. Adjust the fence and try to flush the chisel into it.
There must not be any gap between the alignment, and the hollow chisel should be flushed to it.
Keep adjusting the hollow chisel until it sits flush with the fence.
You can also square the hollow chisel using a straight gauge.
Adjust the fence to the straight edge and the fence to make a right angle and try to fit the chisel.
See if there’s any gap. Adjust the chisel bit until it is flush with the fence and gauge.
When the chisel is already flushed to the fence, lock the knob of the chisel holder to secure its position.

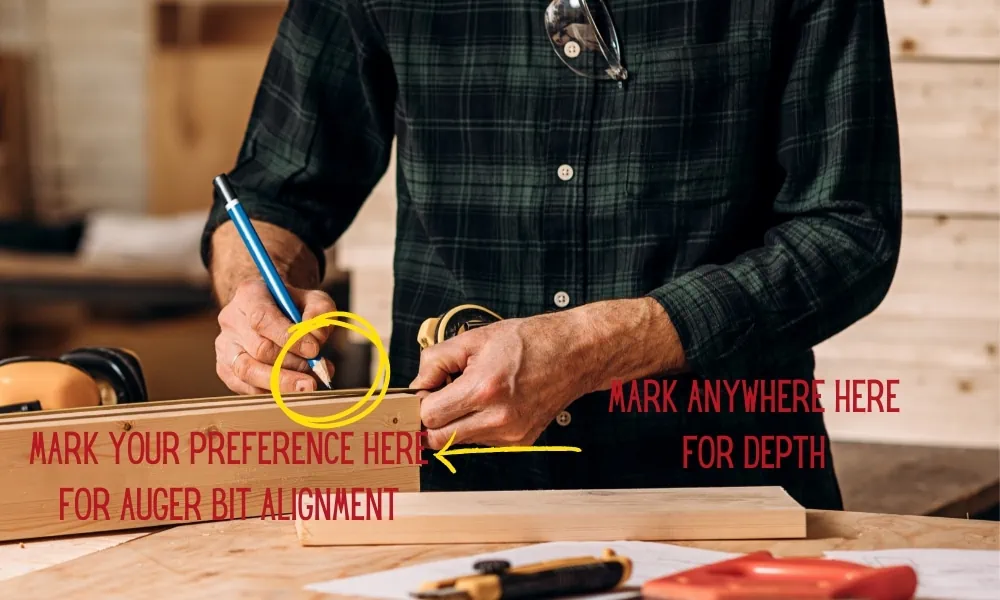
Step 3 Align the workpiece.
Aligning the workpiece is positioning the chisel to the cutting layout.
So draw or mark your mortise onto the workpiece with the required dimension.
On the other side of the piece, mark your desired depth.
Align the workpiece to set it on the fence.
Adjust the fence with the workpiece and align the center of the auger bit to the center of your marked layout.
When the tip of the auger bit is aligned to your cutting mark, make sure the piece is flushed to the fence. Lock the fence.
Step 4 Set up the depth.
Go back to your marked depth on the side of the wood piece you will be drilling. Lower down the mortising bits.
Lower it until the depth mark on the wood piece levels with the top of the arc of the chisel bit.
When it is exactly leveled with the chisel bit arc, set your machine’s depth stop by locking it in place.
This step ensures that the mortising bits will not cut the fence and the machine will not press further down than the set depth.
Step 5 Secure the workpiece.
Some models have different stops. Some mortiser has a hold-down mechanism, which prevents the wood piece from lifting with the mortising bits when mortising.
Make sure it is set to the center of the hold-down and the square hole drill bits pass through the teeth.
When it is fully flushed against the fence and the hold-down, lock the hold-down knob.
Some models have a clamp on the front that prevents the wood piece from tipping while the machine is running.
Simply adjust it by the knob and make sure the wood piece is fully flushed against the fence and the clamp.
Some models have side stops to set the maximum width for adjusting the wood piece while mortising.
Simply slide down the wood piece left and right to your desired maximum width and lock them with the knobs.
Step 6 Apply dry lube.
Now that the wood piece and your mortising bits are set, you are almost ready to cut mortises.
Mist some dry lube on the square hole bits to reduce heat and metal-to-metal contact.
Step 7 Start mortising.
You can now start mortising by following the cutting marks on the wood piece.
Start on the sides and into the center.
If you’re cutting long mortises, allow gaps between square holes before running down the square hole drill bits to cut the mortise entirely.
Your Tips from Banging Toolbox
The mortising machine may be a specialized machine, but the tool offers many possibilities for joinery, cabinetry, and woodworking.
The key to enjoying the benefits of precise cuts of the square hole drill bits is proper setup and the right technique. Choose the appropriate drill bit size. Clear the wood dust on the bits when required.
Many things can go wrong during this process a mishap could create a huge impact on your final hole.
When you put the mortising bits in the appropriate position and determine where to strike the cut, you can pull off square hole cutting easily and fast.
Provide adequate support. And focus. Master the art of control and attention to detail. Use a durable set of mortising drill bits.
If you’re interested in cutting circles, check this out.


